一个典型的服务端启动操作大概是:
 public void run() throws Exception{

EventLoopGroup bossGroup = new NioEventLoopGroup();

EventLoopGroup workerGroup = new NioEventLoopGroup();

try{

ServerBootstrap bootstrap = new ServerBootstrap();

bootstrap.group(bossGroup, workerGroup)

.channel(NioServerSocketChannel.class)

.childHandler(new SimpleChatServerInitializer())

.option(ChannelOption.SO_BACKLOG, 128)

.childOption(ChannelOption.SO_KEEPALIVE, true);

System.out.println("SimpleChatServer 已启动");

ChannelFuture future = bootstrap.bind(port).sync();

future.channel().closeFuture().sync();

}finally {

workerGroup.shutdownGracefully();

bossGroup.shutdownGracefully();

System.out.println("SimpleChatServer 已关闭");

}

}
(以下内容请结合源码看, 善用 idea 的快捷键 ctrl + b / ctrl + alt + b / alt + f7)
Bootstrap 的诸多操作都是配置之前提到的, 例如配置 Reactor(EventLoopGroup), 利用 ChannelFactory 中的反射方法新建 NioServerSocketChannel, 配置 ChannelHandler, 配置 ChannelOption, 在 ServerBootstrap 中, 真正导致启动的函数是 bind(port), sync() 会产生一个 ChannelFuture 对象, 在未来进行同步.
在 bind() 函数中, 首先执行的 validate(), 是为了验证刚刚设置的参数是否正确, 例如 group, channelFactory等等, 接下来 doBind().
在 doBind() 中首先就是 initAndRegister(), 在客户端这个也会被调用, 但是是通过 connect(), 然后 doConnect() 的方法进行调用. 在 initAndRegister 中分为 init 和 register, init 中会将之前的配置项一个个加载, 例如 pipeline 的真正初始化组装.
pipeline
pipeline 初始化时会被实例化为 DefaultChannelPipeline. 主要是设置
 tail = new TailContext(this);

head = new HeadContext(this);
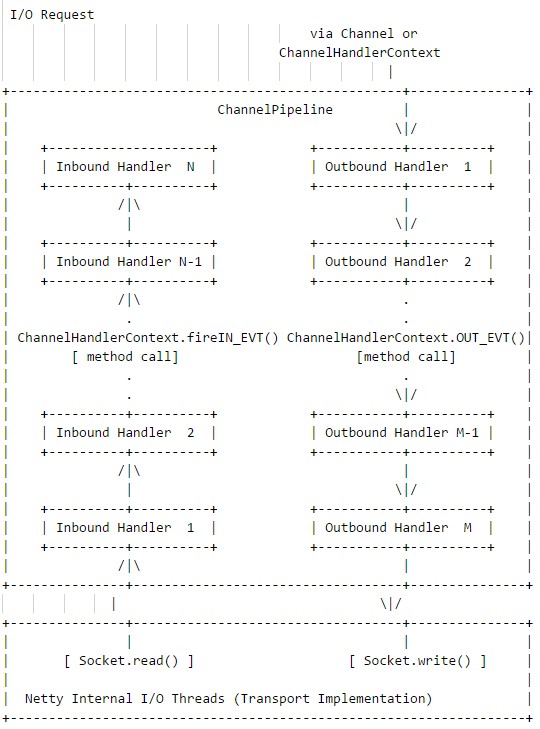
TailContext 实际上是 ChannelInBoundHandler, HeadContext 实际上既是 ChannelInBoundHandler 也是 ChannelOutBoundHandler, 更多情况下是 ChannelOutBoundHandler. 所谓 InBound 与 OutBound 实际上是 Netty 将事件分为了 Inbound 和 Outbound 事件:

在 pipeline 中添加 ChannelHandler 实际上是向 pipeline 的双向链表中添加 ChannelHandlerContext, 这些 ChannelHandler Context 会有 inbound 与 outbound 属性, 以便在事件传播时按照责任链传播.
Inbound 事件传播方法有:
ChannelHandlerContext.fireChannelRegistered()

ChannelHandlerContext.fireChannelActive()

ChannelHandlerContext.fireChannelRead(Object)

ChannelHandlerContext.fireChannelReadComplete()

ChannelHandlerContext.fireExceptionCaught(Throwable)

ChannelHandlerContext.fireUserEventTriggered(Object)

ChannelHandlerContext.fireChannelWritabilityChanged()

ChannelHandlerContext.fireChannelInactive()

ChannelHandlerContext.fireChannelUnregistered()
Oubound 事件传输方法有:
ChannelHandlerContext.bind(SocketAddress, ChannelPromise)

ChannelHandlerContext.connect(SocketAddress, SocketAddress, ChannelPromise)

ChannelHandlerContext.write(Object, ChannelPromise)

ChannelHandlerContext.flush()

ChannelHandlerContext.read()

ChannelHandlerContext.disconnect(ChannelPromise)

ChannelHandlerContext.close(ChannelPromise)
在捕获一个事件之后, 如果想让事件传播下去, 需要调用相关的传播方法. 例如后面的 WebSocket 实践中:
protected void channelRead0(ChannelHandlerContext ctx, FullHttpRequest request) throws Exception {

if(wsUri.equalsIgnoreCase(request.uri())){

//如果请求是 WebSocket 升级,递增引用计数器(保留)并且将它传递给在 ChannelPipeline 中的下个 ChannelInboundHandler

ctx.fireChannelRead(request.retain());

}else{

//...

}

}
原来是这个意思啊!
总的来说, OutBound 事件都是请求事件(request event), 即请求某件事情的发生, 然后通过 Outbound 事件进行通知. Outbound 事件的传播方向是 tail -> customContext -> head.
我们以 connect 方法为例, 在 Bootstrap调用 Connect 会发生如下调用链:
Bootstrap.connect()
-> Bootstrap.doConnect()
-> Bootstrap.doConnect0()
-> AbstractChannel.connect()
–implementation–> DefaultChannelPipeline.connect()
-> TailContext.connect()
–implementation–> AbstractChannelHandlerContext.connect()
-> next = findContextOutBound()
-> next.invokeConnect()
findContextOutBound() 其实是以当前Context 为起点, 顺着 pipeline 往前找第一个 outbound 为真的 Context, 于是调用了它的 connect 方法. 这样就完成了链式调用的一节.
Inbound 事件是一个通知事件, 即某件事已经发生了, 然后通过 Inbound 事件进行通知. Inbound 通常发生在 Channel 的状态的改变或 IO 事件就绪. Inbound 的特点是它传播方向是 head -> customContext -> tail. Inbound 与 OutBound 链式调用的方法类似, 只不过传播是从 head 节点开始传播, 发起者是 Unsafe 对象.
Register
回到刚刚说的 register 调用, register 会调用 EventLoopGroup 的 register() 方法, 实际上的 implementation 是 MultithreadEventLoopGroup 的 register() 方法, 而在这个类中会调用 next().register(channel), 这是 SingleThreadEventLoop 的 register() 方法, 在最后是 AbstractUnsafe 的 register() 方法.
在 register 中又会验证参数合法, 调用 register0(), 在调用 doRegister() 方法, 最后实际实例化的是 AbstractNioChannel 中的 doRegister 方法:
selectionKey = javaChannel().register(eventLoop().selector, 0, this);
javaChannel 返回一个 SelectableChannel (jdk 原生), eventLoop().selector 也会返回一个 jdk 原生的 Selector, 在这里终于将 SocketChannel 注册到 eventLoop 相关的 selector 上. (盘根错节终于找到最后与原生 jdk 联系的源码)
Group
了解如何注册之后, 还需要了解 Reactor 是怎么工作的. 上一篇把 Reactor 比作了为领导接电话的秘书, 由于 Netty 人为的分了 bossGroup 与 workerGroup, 在这里可以把 bossGroup 比作前台统一的接待员, workerGroup 相当于老板的秘书们. 需要找老板的现在前台统一注册, 然后由前台 accept 分配给秘书池(workerGroup pool), 最后由workerGroup 分配 EventLoop 到不同的 handler.
在源码中, bossGroup 和 workerGroup 其实被叫做 parentGroup 与 childGroup.
(netty 开发者的起名能力真的不敢恭维, 不说诸多让人迷惑分不清的类名 —— SocketChannel/ServerSocketChannel/ServerChannel/NioServerSocketChannel/NioSocketChannel 你分得清吗? 对于这种可以明确的, 你倒是起一个一贯的名字啊.)
在上面提到的 init 中, 会有如下操作
pipeline.addLast(new ServerBootstrapAcceptor(

currentChildGroup, currentChildHandler, currentChildOptions, currentChildAttrs));
结合之前对 pipeline 的理解, 在这里看到为 pipeline 添加了一个 ChannelInitializer, 也是 ServerBootstrapAcceptor, 在 ServerBootstrapAcceptor 中, 重写了 channelRead() 方法:
public void channelRead(ChannelHandlerContext ctx, Object msg) {

final Channel child = (Channel) msg;

child.pipeline().addLast(childHandler);

...

childGroup.register(child).addListener(...);

}
ServerBootstrapAcceptor 中的 childGroup 是构造此对象是传入的 currentChildGroup, 即我们的 workerGroup, 而 child 是一个 NioSocketChannel 的实例, 因此这里的 childGroup.register(child) 就是将 workerGroup 中的每个 EventLoop 和 NioSocketChannel 关联了. 当一个 client 连接到 server 时, Java 底层的 NIO ServerSocketChannel 会有一个 SelectionKey.OP_ACCEPT 就绪事件, 接着就会调用到 NioServerSocketChannel.doReadMessages:
protected int doReadMessages(List<Object> buf) throws Exception {


SocketChannel ch = javaChannel().accept();

... 省略异常处理

buf.add(new NioSocketChannel(this, ch));

return 1;

}
在 doReadMessages 中, 通过 javaChannel().accept() 获取到客户端新连接的 SocketChannel, 接着就实例化一个 NioSocketChannel, 并且传入 NioServerSocketChannel 对象(即 this 对象), 由此可知, 我们创建的这个 NioSocketChannel 的父 Channel 就是 NioServerSocketChannel 实例 .
接下来就经由 Netty 的 ChannelPipeline InBound 机制, 将读取事件逐级发送到各个 handler 中, 于是就会触发到 ServerBootstrapAcceptor.channelRead 方法.
Thanks again for the blog. Thanks Again. Fantastic. Walter Thede